


How to Scuff-Sand Furniture Before Painting it.
How to Scuff-Sand Furniture Before Painting it
When painting furniture, you need to ensure that the paint will adhere well to the surface of the piece you’re working on. The last thing you need is peeling, bubbling and cracking paint. It takes time to reimagine an old piece of furniture and re- create a new one. It also costs money to purchase supplies. Prepping furniture well facilitates a beautiful, durable finish. But do you always need to scuff-sand furniture and if so, do you know how to scuff-sand furniture before painting it? Read on for some helpful information on when and how to scuff-sand your piece of furniture before applying your paint
My general rule of thumb is to scuff-sand the surface of my furniture before painting it most of the time.
Scuff-sanding is when you sand all of the piece just enough to create an overall slightly roughened-up surface that gives the paint something to ‘cling’ onto. You're not sanding completely through to the wood or chipboard etc' underneath, you just need to sand the top surface to 'scuff it up'!
Think of it like a dentist slightly roughening up the surface of your tooth (I don’t know the technical term that dentists use, but you get my gist…) before, for example, attaching a crown or composite filling to it . The tooth enamel is a smooth slick surface that won’t help the crown adhere, so to increase the chance of optimum adherence, creating a slightly rougher surface is needed.
The surface of your furniture may be wooden, that has some kind of varnish topcoat, or it may be laminated which is a slick surface that could be too slick for any paints to stick to. Occasionally, paints, such as some chalk paints, claim to stick to most surfaces and say that sanding before painting isn’t necessary (always check this with the brand that you’ve purchased).
As tempting as it is to save time and labour by skipping this step, I usually still prefer to scuff-sand, especially if painting laminate. At the very least, if you’re determined to eliminate the step of sanding, with paints that say you really don’t need to, I’d suggest that you de-gloss your piece of furniture to reduce the slickness of the surface and create a surface that offers more ‘grip’. Rinse off the deglosser residue well and dry your piece before applying your paint.
Is Sanding by Hand or Electrical Sanding Best...
When considering how to scuff-sand furniture before painting it, you need to decide which supplies or tools you will use. You can sand manually, or use and electrical sander.
Electrical sanders will help you get the job done more quickly, although you usually need an element of hand sanding to get into hard to reach places.
If you’re totally new to refurbishing old furniture and you don't want to invest in power tools just yet, don’t worry…it’s possible to scuff-sand furniture by hand!

Yes...scuff sanding by hand is more labour intensive and takes more time than using an electrical sander, especially if it’s a large piece of furniture, but since you’re going to be painting the piece, then you aren’t aiming to sand down to raw wood (if your piece is wooden). Nor are you trying to remove the laminate (if the piece is laminated), so scuff-sanding by hand can definitely be done!!
How To Scuff Sand by Hand With Sanding Paper and Sanding Pads

The aim here is to roughen up the overall surface enough for the paint to adhere to.
For this you’ll need medium grit sanding pads (approximately 180-220 grit). If the surface is laminated I prefer to use 180, as laminate is a very slick surface. Use the sanding pads for larger flat surfaces, then sanding paper wrapped around these handy 'contouring sanding grips' (see photo on left) to sand into any tight corners, or carved detailing. It’s really important for the sake of uniform adherence that you sand everywhere that you’ll be applying paint to.
When scuff-sanding by hand, apply enough pressure to scuff-up/roughen up the existing finish, but not so much pressure that you’re cutting through into the surface below. If you’re working with a laminated surface, it’s likely that particle board or mdf etc’ will lie underneath the laminate. It’s only the initial surface of the laminate that you need to scuff-up, not down to the substrate beneath it.
When sanding tight corners, narrow ledges and detailing by hand, if you don't have the 'contouring sanding grips' (pictured above) you can take your sanding paper and either fold it into a shape that can access the hard to reach areas, or you can wrap the sanding paper around an object (e.g old bank cards/gift cards ect’) to fit neatly into the space you want to sand.
Remember to wipe away all of the sanding dust before you prime and paint. I use a lint -free cloth first then use these Tack cloths after, to pick up the final little bits of dust, so that no dust will spoil my lovely smooth paint job.
How to Scuff-Sand Using an Electric Orbital Sander...
If you’re thinking of refurbishing and revamping a few pieces of furniture, and think that you’ll want to do more of it going forward, then it's definitely worth investing in an orbital sander to cut down on your labour. You can purchase start out orbital sanders relatively cheaply. Here, I’m talking about the basic set-up, budget friendly options that will get the job done in a fraction of the time.
An orbital sander has a round flat face to attach the sanding discs to. The orbital sander oscillates and you’ll feel the fast vibration.

You’ll need to be sure to purchase the sanding discs that will work with your brand. Again, for scuff sanding I use either 220 grit sanding discs, or 180 grit if I’m working with laminated furniture.
For ‘scuff-sanding’, first attach your sanding disc to the sander, switch on it on and place it flat on your piece of furniture, moving it at a medium pace along flat surfaces section by section. Don’t apply too much pressure or stay on one spot for too long, as you may sand through to the substrate beneath. Be sure to keep the sander flat; if you lean on one side more than the other you could dent your surface.
Caution: Orbital sanders can work fast, so take extra care around edges so that you don’t chip and edge off. You can always hand-sand the edges/ledges if you prefer to be on the safe-side.
As the orbital sander is a round shape, you’ll still need to hand-sand into tight corners and carved details (unless you choose to also purchase a detail sander, or a corner sander (photo below) / or use a dremel-type tool.


Orbital sanders and detail sanders come in a wide price range, and if you’re just starting off and you’re unsure how much you’ll use it, or you have a tight budget, you can get your scuff sanding done no problem with the budget-friendly options. I’d suggest purchasing one that comes with a little dust bag. It won’t catch all of the dust, and you’ll have to empty it out once or twice if you’re sanding a large piece of furniture, but it’ll make your clean-up easier.
The following electric orbital sanders and corner/detail sanders are popular options for people starting off who don’t feel ready to make a big investment:
Ryobi 5' inch random orbital sander with dust bag. Uses 5 inch sanding discs
DeWalt orbital sander and sanding discs
Black & Decker Cordless, battery operated random orbital sander:
The up-side to this brand is that it's very lightweight, so it's easier on the wrists and arms. Also as it's cordless you can sand your piece in the yard/garden away or anywhere without having to think about accessing a nearby power outlet.
The downside is that you may need to stop and recharge the battery mid-job if you’re scuff sanding a large piece of furniture, and that can feel frustrating.
If you’re thinking of refurbishing and revamping a few pieces of furniture, and think that you’ll likely do more of it going forward, then it's definitely worth investing in an orbital sander to cut down on your labour. You can purchase start out orbital sanders relatively cheaply. Here, I’m talking about the basic set-up, budget friendly options that will get the job done in a fraction of the time.
**Please Note If you’re thinking about flipping multiple items of furniture for profit in the long term, then you’ll also benefit from purchasing a shop-vac to reduce your dust clean-up.
Electric Sanding Tools For Detail Sanding and Sanding Corners.
If you’ve decide that you don’t want to hand sand the harder to reach tight corners and detailing, then there are a few great options out there in terms of electrical sanders to help you get the job done.
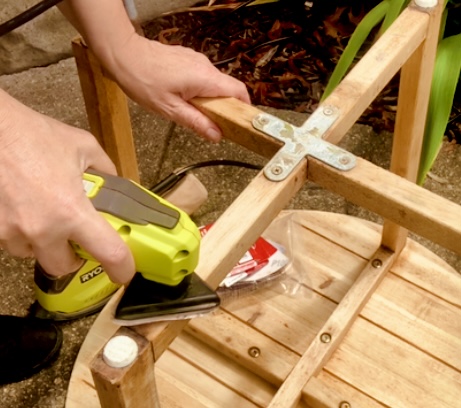
If it’s mostly sanding corners of furniture and inside of drawers that you’d like to find a faster solution for, then a 'corner cat' sander is great. Shaped like a little handheld iron, you just purchase the attachable sandpaper, mask-up, switch on, and get into those corners. I use mine regularly and wouldn’t be without it!!
There is a handheld electrical detail sander (pictured above) that is even lighter and makes getting into more tricky-to-reach parts even easier, especially since it’s a breeze to manoeuvre. With it's small triangular sander surface you just attach the triangular sanding paper made for this specific model, and sand away!
Finally for really intricate detailing or super narrow spaces you can sand with dremel tool, using the sanding attachment.
Again, whichever methods you choose for scuff-sanding, be sure to thoroughly wipe away all the dust before you prime and paint! Applying primer before painting helps your paint adhere really well. You can read my blog post on 'Priming Furniture Before Painting' here .
Popular posts

Priming Furniture Before Painting: When to Do it & The Best Primers to Use
By Nuri Furnishings

Howto Dilute Wood Stain for Controlled Colour Application
By Nuri Furnishings

Different Types of Furniture Paint: Which Type ofFurniture Paint is Best for Your Project?
By Nuri Furnishings

Howto Spray Old Furniture Hardware: Knobs and Pulls.
By Nuri Furnishings

How to LightenWood and Reduce Orange Tones.
By Nuri Furnishings

Howto Clean up Old Tarnished Metal Drawer-Pulls & Knobs
By Nuri Furnishings
