


How to Apply Decorative Waxes to Enhance Furniture
Applying Decorative Waxes over parts of your painted or wooden furniture can give your piece a beautifully bespoke and characterful look. Whether you are wanting to simply accentuate and embellish the detailing, or give your piece a more antiquated look, decorative waxes are an easy and relatively inexpensive way to create an eye-catching aesthetic. Read on to find out how to apply decorative waxes to enhance furniture.
Decorative Waxes: Colour Options
When considering how to apply decorative waxes to enhance furniture you'll need to visualise and decide what look you're aiming for and which colour waxes to choose. There are quite a few colour options! The most popular colours of decorative waxes for creating a shaded effect, or for an antiquing effect tend to be the darker colours: Black, Dark brown or Medium brown.
For embellishing detailing on the piece of furniture, eg; making the carved details ‘pop’ then some metallic options can be really popular (see photo)

Antique Gold, Bronze, Copper , Silver or Brass are all metallic tones that I find can beautifully enhance carved detailing. There are many other metallic tones out there, but what you choose will very much depend on the colour of the wood or paint that you’re going to be applying the wax over, and the look you’re trying to achieve.
As well as the aforementioned most popular colours of decorative waxes, there are also white waxes and a whole range of other colours. I recently used a greenish-blue wax to help create a ‘verdigris effect’ (*To read more on what a ‘verdigris effect’ is and how to achieve it wiith paint readthisarticle).
How to Apply a Decorative Wax to Your Furniture...
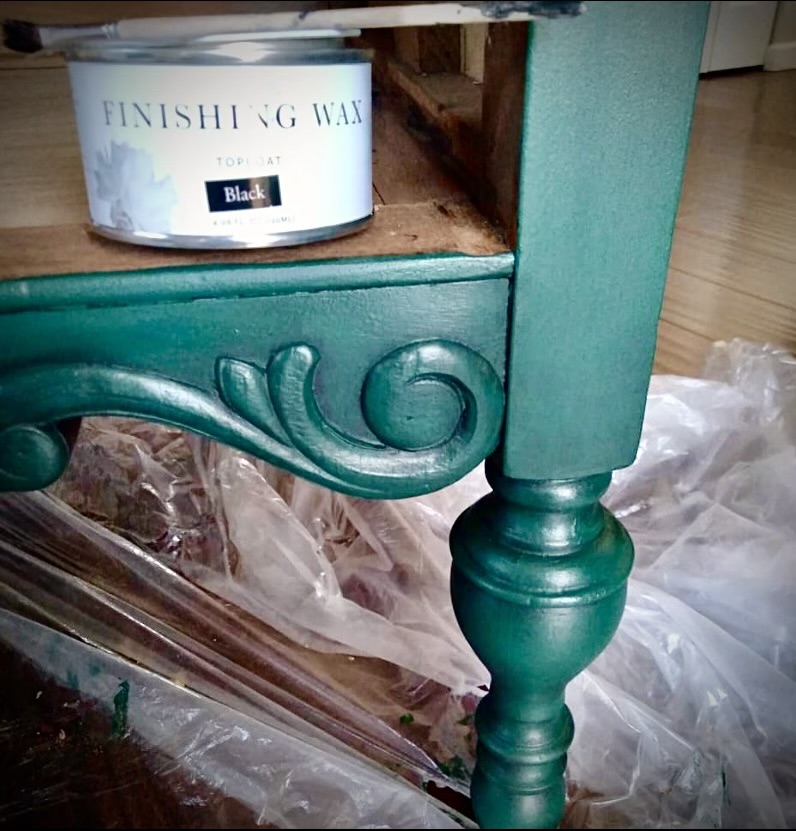
Before considering how to apply a decorative wax to your furniture, and before applying your decorative wax to create shadows/embellish detail etc’, your piece of furniture must be sealed all over ie; topcoated with a polycrylic, polyurethane or sealed with a clear wax finish. The topcoat needs to be dry before you apply decorative wax to it. Never apply decorative waxes first. Always last! (*Read more on which topcoat is best to protect furniturehere) Apart from the fact that your furniture needs a topcoat to protect it, decorative waxes are applied relatively sparingly, and they often need to be wiped back a little if too much wax has been applied, or blended a little, so the surface you’re applying them to shouldn’t be
porous (otherwise you’ll have a harder time controlling the depth of colour when you apply it).
Supplies needed to apply decorative wax:
To apply the decorative wax of your choice you’ll need one or more of the following, depending on what effect you’re aiming for:
-A wax brush, for creating shading on larger areas.
-a soft lint free cloth (if you prefer this to using a brush).
-a thinner artist brush (if you are waxing into tight detailing or crevices).
- I also have a piece of cardboard handy so I can use it to unload excess brush off my wax before applying it.
**If the dried topcoat finish of my piece of furniture is polycrylic or polyurethane, I like to apply clear wax on top of it, only onto the areas that I'll will be applying decorative wax to. I do this before I apply any decorative waxes, and wait for it to dry. This way, if I later apply too much decorative wax by mistake, it's really easy to wipe back if clear wax was applied underneath it. If your all-over topcoat of choice was clear wax to begin with, then once it's dry you can apply your decorative wax in the areas you have chosen to shade or embellish.
First: determine where you’re going to apply wax and what effect you’re aiming for.
Create shadows: Applying wax to areas where shadows would naturally occur eg; in corners and inverse ledges’/ panelling and deep crevices etc’ will lend your furniture an extra air of dimension. This is often done with darker waxes.
Step 1: Apply some to the tip of your brush, then offload any excess by lightly dabbing it off on a piece of cardboard.
Step 2: Apply your wax to the area in sections, using strokes, or on smaller detailing you can dab it on with your finger or the corner of a lint-free soft cloth (if the brand you are using is toxin-free).
Step 3: Wipe back the excess with your lint free cloth, so that it creates a muted shadow that looks naturally blended in (don’t leave hard edges of dark wax). If you need the shadow to look darker then build up the wax coats (wiping back each time) until you have it just how you like it!
Embellish Detailing and make it ‘pop’: If you have decided to use metallic (or other colour waxes) to accentuate moulding etc’, then you can apply wax with an artist's brush instead of a thick wax brush. Just don't overload the brush, and dab the excess off on cardboard before very lightly brushing over the details you want to ‘pop’.
You can also use your finger dab it on and blend it in if the wax you are using is low toxin.
Again…don’t use too much. You can always apply it again to build it up if you want to.
Clean up: After applying the wax you can clean your wax brush with mineral spirits. Soak the bristles in mineral spirits and dab the brush whilst it’s soaking in the spirits, to dislodge some wax. Change out the mineral spirits and repeat. Once the wax is completely removed from the bristles, then wash the brush with dish soap and water. Rinse well so no residue is left on your brush.
Popular posts

Priming Furniture Before Painting: When to Do it & The Best Primers to Use
By Nuri Furnishings

Howto Dilute Wood Stain for Controlled Colour Application
By Nuri Furnishings

Different Types of Furniture Paint: Which Type ofFurniture Paint is Best for Your Project?
By Nuri Furnishings

Howto Spray Old Furniture Hardware: Knobs and Pulls.
By Nuri Furnishings

How to LightenWood and Reduce Orange Tones.
By Nuri Furnishings

Howto Clean up Old Tarnished Metal Drawer-Pulls & Knobs
By Nuri Furnishings
